


![IMG_0342[1]](https://i0.wp.com/starvinlarry.com/wp-content/uploads/2014/12/img_03421.jpg?w=325&h=243&ssl=1 "IMG_0342[1]")


")


Reblogged on starvinlarry.com
Trim branches and brush near your blind now !
Posted: August 20, 2014 by gamegetterII in Archery, firearms, hunting, survival, UncategorizedTags: archery, firearms, hunting, survival
We’re getting closer to the start of archery seasons in many states now,about 6 weeks or so to go.
Now is the time to check to be sure you have clear shooting lines from your stand (s) and/or ground blind (s).
Hike to your stand,carrying a folding saw,and hand pruners in your daypack.
Sit where you will be sitting while hunting.
Look for any branches or brush that would be in the way of you making a clear shot.
Trim all branches and brush back more than they will grow in the next month or so,you should be able to tell how much they have grown from when you set up your stand/blind a month or so ago. Trim them back at least 6″ more than you think they will grow-you want this to be the last time you trim stuff near your blind.Once you start trimming,place all the branches and brush you have cut in a pile,when done trimming,use the stuff from the pile to “brush in” your blind-you can also do the same to your tree stand,using some green or brown garden twine.
The idea is to break up the profile of your stand/blind,do it is not as visible to the deer.
The reason for setting up the stands/blinds a month or so back was so that the deer got used to them being there,and didn’t associate them with danger.
Now that they are used to them,go ahead and camouflage them up better using the trimmings from cutting your shooting lanes. If that’s not enough,trim off more twigs and branches from surrounding trees and shrubs.
The object is not to make your blind/stand to look like something-it’s to make it look like nothing-same idea with your personal camo.
Good explanation of camouflage here…
“Remember:
Camo is a concept (i.e., how to blend into one’s environment), not a pattern.”
http://westernrifleshooters.wordpress.com/2013/07/29/personal-camouflage/
While the above is for personal camo- many of the same things apply to your stand/blind.
The thing you are trying to do is to make your blind/stand appear to be just a part of the forest,field,swamp-wherever it’s located.
You don’t want to try and make it look like a tree or shrub-you want to try to make it look like it’s a part many trees/shrubs-not a blob that’s got some branches sticking out of it.
It’s not an easy thing to explain-camo is a concept,it’s not any one pattern for your clothing,or your blind/stand-you want to blend into your surroundings,look like just a normal part of the field/swamp/forest when someone-or some animal-looks at the location you want them to see a part of the surroundings-not something that does not blend in.
I’ll post some pics soon-I’m just not all that great at taking cell phone pics-then getting them onto the computer-then finding them again to post.
I may have to seek the help of the kids.
Once you have your blind/stand brushed in,and it blends in with it’s surroundings,start putting out corn if it’s legal where you live. I do not use feeders here in Ohio,I just spread some shelled corn on the ground-not in a pile-spread it around about a 6′ diameter circle,add some cob corn to the area as well. Not putting the corn in a pile not only keeps the deer in one place longer,it helps to prevent the spread of disease between deer.
Check your mineral blocks-if they have been mostly licked down to the halfway point or more-put new ones out. I’ll add some regular salt blocks now too-I buy the stockman’s blocks with added minerals when they’re on sale,and use some of both regular salt block,and salt+ minerals.
Remember,you are putting them out not only to attract the deer,but to help keep the local deer herd healthy,and to insure the bucks have the nutrients they need to grow big racks.
I buy a large block at the feed store,or Tractor Supply,then I cut it up into blocks about the size of the mineral blocks. Cut them at least 2-2 1/2″ thick,3-4″ wide,and 8-12″ long.
I use a pruning blade on a sawzall to cut up the big block-goes through it like it’s cutting butter.
Remember to visit each stand/blind at times when deer are least likely to be in the area.
Since you’re in the woods-be sure to check the deer trails to see what their main food source is,then figure out when they will go from that to acorns,and plan your hunts accordingly.
Check your trail tacks or surveyors tape to make sure all your trails are still clearly marked.
That’s it for this one-more coming soon.
Read.
Learn.
Train.
Do more PT !
Anti hunting propaganda from HSUS
Posted: August 19, 2014 by gamegetterII in hunting, UncategorizedTags: hunting
More anti-hunting bullshit from HSUS-who’s president-wayne Pacelle stated one of their top goals is to ban all hunting and trapping-along with forcing everyone to become vegan.
http://www.buckeyefirearms.org/hsus-leading-attacks-lead-ammo
My response to idiotic anti-gun story on HuffPo
Posted: August 19, 2014 by gamegetterII in Uncategorized“Yeah, yeah, yeah, we have the right to bear arms per the Second Amendment, but that was signed into law way before assault rifles were even a glimmer on the horizon. We are at an impasse in our country, society and culture, and must find a way to resolution.”
Yeah,yeah,yeah,we have the right to free speech per the second amendment,but that was signed into law way before computers and the internet were even a glimmer on the horizon.
No “we” are not at an “impasse”-anti-gun zealots who want to deny people their second amendment rights due to the actions of a few mentally ill individuals-are the ones who are at an “impasse”.
I’ll give up my modern firearms just as soon as the internet is shut down,all computers are banned,and everyone has to write via an ink well and a quill pen.
Because,you know,the founders could never have envisioned the internet,and the first amendment should only apply to inkwells and quill pens.
This has to be the single most idiotic anti-gun drivel produced by the left so far this year.
Someone needs to expend a tad more effort on educating these clueless dolts.
Why I haven’t written much lately
Posted: August 18, 2014 by gamegetterII in UncategorizedTags: car repairs
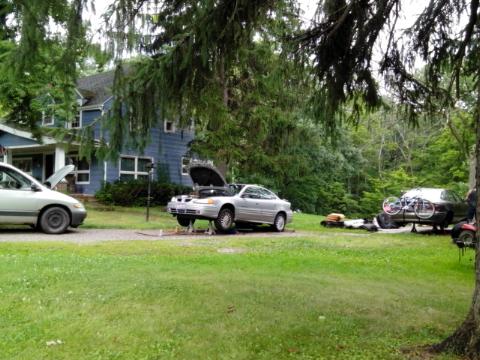
Alternator on van,starter on first car up on 2 jackstands,replaced all brake lines on car with bikes on back,that’s up on 4 jackstands.
2 of the 3 are the kids vehicles-couldn’t be the easy one…
We had all girls-none of them have a boyfriend or husband with enough sense to do shit like this-(to be fair-one’s willing to learn)-so It’s dad’s garage for all repairs.
More on hunting with muzzleloaders
Posted: August 17, 2014 by gamegetterII in firearms, hunting, shooting, survivalTags: firearms, hunting, shooting, survival
Those of us with older .50 caliber muzzleloaders,or the inexpensive .50 caliber inlines that can not handle the 150grain magnum charges can still use some of the technological advances in muzzleloading bullets.
The combo of a .44 caliber hollow point bullet-such as the Hornady XTP,and green plastic sabot for use in .50 caliber muzzleloaders is one good combo to use ,another is the line of PA conical bullets from Hornady.
I am not a Hornady spokeperson,nor do I benefit in any way from mentioning their products.
I use the 240 grain .44 caliber XTP jacketed hollow point bullet with green sabot over a 95 grain charge of Triple 7 as my main hunting load in most of the places I hunt in Ohio.
In a couple of places,I use the 240 grain PA conical,as it is heavier than a round ball,and does not require use of a lubed cloth patch. Hornady claims no patch is needed,but I have found the bullets perform much better with a felt patch between powder charge and bullet. Some states require you to use lead round ball or conical bullets during their muzzleloader seasons.
Both will give you great accuracy out to 100 yards,the .44 caliber XTP bullet with green sabot gives good accuracy out to 150 yards in both of my muzzleloaders.
For feral hogs,I use the 385 or 425 grain PA conicals,or the 300 grain XTP’s,when elk hunting with muzzleloader,I cough up the extra $$$, and buy a box of 300 grain Swift A-Frames.
Since I have a newer-(last year)- inline,I’ll use a .45 caliber 240,or 250 grain XTP bullet,with the black sabot as my first round for hunting,as they get a little better velocity,and have more energy. The problem with them is they quickly foul the barrel,making reloads difficult.
I also bought a box of 230 grain lead round nosed bullets to use for target shooting,along with the black sabots for use in .50 caliber muzzleloaders.
They are accurate,and hit to almost the exact same point of impact as the .44 caliber 240 grain XTP’s with green sabot.
The problem is that at ranges much over 50 yards,they start hitting way to the left-as in 3-4″ at 75 yards,and 10-12″ at 100 yards.
I believe that’s due to the powder charge not being 150 grains,causing the bullet to de-stabilize at ranges greater than 50 yards.
Since they are accurate to 50 yards,I’ll use up the remainder of the 200 round box I bought for target practice at 50 yards or less.
I’ll continue to use the Hornady XTP as my hunting bullet,they do not shoot the best out of all muzzleloaders,but they shoot the best out of mine.
Try as many different bullet/sabot combos as it takes until you find one that gets you 3″ or better groups at 100 yards,if you are using an inline with scope-sight it in at 100 yards-that way you will hit a couple inches high at 50 yards,and a few inches low at 150 yards-still in the vital organs of deer sized game.
If you are using iron sights and no scope,sight in at 50 yards because you aren’t going to be taking many shots beyond 50-100 yards,so a 50 yard zero is fine.
If your muzzleloader is like my older CVA,it’s not accurate until a couple of shots have been fired through it. I take mine out and fire 3 shots,run a couple of dry patches down the barrel a day or two prior to hunting season,and leave it like that until the end of the week-or 2 weeks depending on your state’s season-or until I get a deer before thoroughly cleaning it.
Be sure you target shoot at a bunch of unknown distances,and shoot from a variety of angles and firing positions in the months prior to hunting season-that way,you have a much,much better chance of making a kill shot on a deer.
Read.
Learn.
Train.
Do more PT !
lawmakers want to end transfers of military equipment to police
Posted: August 16, 2014 by gamegetterII in UncategorizedTracking wounded deer
Posted: August 16, 2014 by gamegetterII in hunting, UncategorizedTags: archery, firearms, hunting, shooting, survival
Sometimes you make a less than perfect shot on a deer,and you hit it at the edges of the vitals,it happens to everyone at some point if you hunt long enough.
If you know you made a bad shot,the first thing you have to do is stay put-do not attempt to track the deer for at least 45 minutes to an hour.
I carry a roll of surveyors tape in my hunting pack,you need to carry something that can be used to mark the blood trail. I use the surveyors tape because it’s brightly colored,and easy to tie around branches,shrubs,logs,etc.
After you have stayed put for at least 45 minutes,go to where the deer was standing when your arrow hit it-or your shotgun slug,muzzleloader bullet,or rifle bullet. Look for blood until you find it,or look for your arrow. Mark the first spot where you find blood.
Walk-very slowly- in the direction the deer ran,look for blood drops on the ground,on branches or grasses at the deer’s height until you find the next blood drops.
Look at the blood,the color of the blood can tell you a lot-bright red blood means you hit an artery-a good sign,dark blood usually means a liver shot,blood with bits of partially digested food-acorns,corn,grasses,etc. means a gut shot.
If you have found dark blood,or bits of food in the blood-stop tracking the deer,let it lie down and bleed out,wait a couple hours before following the trail any farther.
*The only exception to this would be if outside temps are very warm,and will not go down below 40 degrees that night. In that case-keep slowly following the trail,paying attention to your surroundings,and keep looking for places that provide thick cover for the deer-that’s where it most likely is.
Try to stalk as close as you can to the cover without spooking the deer,you may be able to get a second shot at it when it gets up from where it has bedded down,as it is not going to be able to get up and run very fast,due to it’s wound. If you don’t get a second shot-keep tracking it,as sometimes keeping the deer moving will help it bleed out faster.*
Keep slowly walking in the direction the deer ran,marking each place you find blood with the surveyors tape. If you lose the trail,and don’t find the next blood drops-go back to the last place you found blood,and slowly walk in a circle,with the trail being the center of the circle,start with a small circle-say 5 yards on each side of trail,if you don’t find blood,walk a slightly bigger circle,keep repeating this until you find blood.
Mark the spot you just found blood,look back at the tape you marked the last blood at-and see if the deer is going the same direction,or if it has changed direction. Keep slowly walking in whatever direction the deer is moving until you find the next blood drops.
99% of the time,you are going to find the deer.
Keep tracking the deer in this manner until you have found it-don’t quit looking-you owe it to the deer to do your best to find it.
We all make a bad shot once in a while-it happens to the best of us.
The blood trail from a good shot is easy to follow,as there is a lot of blood on the ground,it’s very easy to see,and the deer seldom goes more than 50-100 yards or so.
I’ve never had a deer go more than 75 yards when hit with an arrow or crossbow bolt-I once had a heart and lung shot whitetail run over 100 yards up a mountainside in W.Va.
The deer was hit with 3 170 grain bullets from a 30-30 using Remington Core-Lokt ammo.
When we field dressed him,the first shot had hit the heart,and got both lungs-one of the three follow up shots had gone through both lungs,one missed,and one hit him in the “knee”. It’s harder than you think to hit a running deer with a rifle.
That was when I was young,no follow-up shot was needed,I knew my first shot was good-I just didn’t know at the time that a deer runs like hell after being shot-no matter how good the shot is-unless you took a head shot,or broke it’s spine-it’s gonna run very fast.
See my previous post for some good target practice methods to hit moving targets-like a running deer. * I do not take shots at a running deer unless it’s one I’ve already hit,or it’s an Ohio deer drive where a line of guys walks across a cornfield to push the deer out towards the guys standing at the spots deer are most likely to come out of the field at.*
Here’s the link to the target practice…
Read.
Learn.
Train.
Do more PT !
This is a simple gravity operated water filter,simple to build,and will filter a lot of water.
Materials:
4′ piece 6″ PVC pipe and end caps.
Washed river gravel-you can buy bags of the stuff at Lowes,Home Depot,Wal-Mart-it’s the small,pebble sized stone.
Play sand,also available at the same places.
Aquarium charcoal,available from pet shops or online.
One 5 gallon bucket-make sure it’s clean.
1 food-grade 5 gallon bucket with lid.
1/2″ PVC
1/2″ PVC ball valve-(on-off valve)
1/2″ faucet screens
Silicone caulk-kitchen and bath type.
1/2″ spade bit
2×3’s and screws to make frame to hold filter and buckets.
First,drill half inch holes in each end cap,bottom of 5 gallon bucket, in lid to food grade bucket,and at bottom of food grade bucket,so the ball valve can be installed there.
Assemble the parts as follows-(without sealing w/ caulk)
The food grade bucket is the bottom of the filter.
The 6″ PVC is attached to the food grade bucket by a 6″ piece of the 1/2″ PVC through the lid.
The 6″ PVC is attached to the other 5 gallon bucket by a 6″ piece of the 1/2″ PVC through hole in the bottom of bucket,and the end cap to the 6″ PVC.
Once assembled-build a frame using the 2×3’s to support the filter.
After you have the frame assembled,take the 6″ PVC,with the 1/2″ pieces of PVC installed,with a 1/2″ faucet washer just below the top of the upper piece of pipe,and just above the bottom of the lower piece of pipe in both ends-start by putting 18″ of charcoal in the pipe,next,put in 18″ of sand,next put in 12″ of river gravel.
Put a bead of silicone caulk around the 1/2″ PVC at all 4 joints,allow to cure for 24 hours.
Install the ball valve at the same time,then apply the silicone caulk,also allow it to cure for 24 hours.
Use a screen,old t-shirt,or coffee filters to pre-filter the water,so most of the debris is removed.
When you need to filter water for drinking water-pour the water to be filtered into the upper 5 gallon bucket,after it has flowed through the filter,take filtered water from the lower bucket as needed.
This method will remove most contaminants,I would still add a few drops of bleach or iodine per gallon,to kill any microorganisms not filtered out.
I’m not all that good with computer tech-so I couldn’t figure out how to make a drawing on the computer-I will just sketch one out,scan it,then add to this post in the next day or two-maybe three.
Read.
Learn.
Train.
Do more PT.
Before you Start Prepping – What Are You Prepping For?
Posted: August 15, 2014 by gamegetterII in Uncategorized
Good article-great point about having gear and not knowing how to use it-that describes more than a few guys I’ve met.
By
In almost every post on the Prepper Journal, we talk of preparing for disasters or emergencies and the simple steps you can take ahead of time to become prepared. Being prepared for specific or even general instances is a worthy goal, but once you get beyond the basics of survival what else is needed? The basics of survival are food, water, shelter and security and we lay out a lot of ideas and recommendations for how to cover those four bases in our how to start prepping article. But does that advice make sense for you in your situation when someone asks you the question what are you prepping for? In some cases, are the basics really basic? What constitutes a disaster to you and is there only one path to becoming “prepared” for anyone and everyone?
What are you prepping for?
There are some…
View original post 1,948 more words
